Monday 21 October 2013

My Dream Come True...

It is no secret that I am in love with Dr Michio Kaku. He is my pretend boyfriend. For real. He built an atom smasher for his high school science fair project and is one of the founders of string theory - how could you not be besotted with such a man?! 
It is also no secret I love yarn. Almost as much as I love my imaginary fancy man. So when I saw this whilst watching SciFi Science on youtube, I almost died with the awesomeness of the situation!


So ladies, or gents if there are any out there reading, have you ever had a similarly glorious image of your pretend boy/girlfriend with yarn? I know there is a Ryan Gosling pic out there, and that is pretty awesome too ;)


p.s. I know I'm a bad blogger, it's back to O.U. for me now and the first month is always hectic! I have many things that just need a photo, and as I'm trying to improve those I have to wait for a weekend (for daylight!) when the other half is about to take the pics.

Monday 23 September 2013

Russian Doll Tea Cosy

This is the first of my two entries to a local tea cosy competition, it is a crochet babushka/ matryoshka/ Russian doll (whichever term you like best!) cosy.

It was fairly quick to make, however, I was unaware that the deadline for this was being extended so I rushed the embroidery and am fairly disappointed by it.

It is based upon THIS pattern over at I'd Like To Be Original. When I made up the pattern as instructed it was huge so I adjusted it to be smaller. It is probably just me not checking tension or something, but it is easy enough to scale down.


I got to enter two cosies to the competition because of a low amount of participants, I won't have a picture of my other one until I go and collect them from the cafe at the weekend.

Any one else out there with the tea cosy bug?

Tuesday 10 September 2013

The Polka Dot Trousers Conundrum

Hey guys!
I have been having a little internal dilemma for a few months now, and that is whether or not I can pull off polka dot trousers. The fabric I have is navy with small white dots on, since I got it all I can think of is trousers, trousers, trousers! I worry that it would be too faddy, or silly on a bigger figure as opposed to the more slender wear anything and look good brigade.
So I did a bit of Pinterest searching and found a few inspiration pics - 


So I guess this is the kind of look I'm going for, wide leg, or, if the fabric will hold it, a kick flare style. I will have to some how check to see if it can hold it, but I have no similar weight fabric for a muslin, and am reluctant to just go for it! Maybe I could just cut a wide leg and try pinning it into shape? Any suggestions would be most welcome!

I still have no idea if they will look silly, or if I will just feel uncomfortable in them, I try to rationalise it by telling myself that I wear patterned skirts, so patterned trousers shouldn't be too much of a difference!
Anyone else got any polka dot/ patterned trousers? If so, or even if not, were you reluctant to wear trousers that weren't plain?

P.S. Just noticed that this is my 100th post! Took long enough to get here ha ha!

Sunday 8 September 2013

DIY Dressform

Hello everyone, this is another very quick post, and it is in response to the lovely Kelly over at Make, Sew, Do who asked in a post I just read, have you ever made a dressform?

The answer to this is yes! I made one a couple of years ago. Sadly I found the gaffer tape method to be a poor choice for keeping its shape and it has been disassembled and recycled/binned since the beginning of the year due to its lack of function.
So just for a laugh at my own expense, here is the evidence!

Apologies for the middle finger, I was not wanting to have a photo at the time!

Maybe one day I will make a gummed paper version, although maybe setting aside a little every month for a proper one some time next year is a better plan :)

Tuesday 3 September 2013

Twinkie Chan's Radish Amigurumi

Hello folks!

I'm sure everyone has heard of the crochet genius that is Twinkie Chan? Well if not you are missing out!

I brought her awesome book "Crochet goodies for fashion foodies" and wanted to make something very quickly to satisfy my need to crochet. So I made a variation on her radish scarf, to be a cat toy. The radish body is the same, I just didn't make the leaves as long.

It is stuffed with a carrier bag and the eyes are just sewn on with some embroidery floss.

I only wish that I had made the leaves a little bit longer so that when I am playing with the cat she doesn't get quite so close to my fingers!


Awww.... she's so adorable! I totally did not just sneak the radish in there for a photo op......


....but it sure does look cuter than when she is trying to  kill it!

Has anyone else made a Twinkie Chan pattern?

Sunday 1 September 2013

4 Suprising Places To Buy Yarn!


 Hello everyone!
Just a quickie here, but I thought I would share with you four places to buy yarn that you wouldn't have expected. Well, I can't promise that every store stocks it but it is certainly true for the ones in my town :)

1. Wilkinsons! Yep, the high street fave stocks yarn. Not the largest selection but you can still pick up some cheap DK weight for a bargain price, £1.35 for 100g according to their website.

2. B and M Stores - They had a good variety of colours, if memory serves right they stocked 100g DK and Baby yarn. Their website doesn't list it but I don't remember it being expensive.

3. Poundland - They stock DK weight in several colours, both in plain and sparkly. They are 3 for 2 and 50g balls. I have used this yarn and it is quite nice.

4. The Works - They stock a few different types of yarn, off the top of my head there is 100g DK and the yarn which is thin with pom pom type balls on it (I can't think of it's proper name!) along with another novelty type yarn also. The DK is £1.25, I'm not sure about the rest.

Are there any places you buy yarn that you wouldn't expect to find it in? Let me know in the comments!

Friday 30 August 2013

Man Bag - A Present For My Dad

For my Dad's birthday, I had bought him a book which he had wanted for ages. However, it was the day before his birthday and it still hadn't arrived (despite ordering it almost two weeks in advance). I was quite upset at the prospect of turning up empty handed so I decided at 8pm that night (as all sane people do) I would make a quilted cartridge bag. I sewed my butt off into the early hours of the morning (as all sane people with work at 7am the next morning do) and by 3am it was almost complete. It turned out a bit larger than I had anticipated and it looked a bit too much like a handbag.

Despite my concerns my Dad loved it, and even took it on holiday with him the following week with some kind of fishing apparatus in! I was so pleased that he liked it so much, it isn't perfect but the construction contained many firsts for me.


As you can see from the outside, there is brown piping round the edges. I had never used piping before and I am now a big fan. It was simpler than I thought and gives structure and a nice looking finish. The green fabric is some sort of canvas type stuff, I didn't buy it so I couldn't say what it is exactly.
On the inside the bag is lined in a heavy brown cotton twill type fabric. Again, I didn't buy it so I don't know what the retail name for it is. As the bag was full of fishing paraphernalia when I took the photos I don't have a picture of the quilted inside. This was another first. Not a difficult thing to do, but I wasn't the neatest and my diamond shapes are uneven. The wadding I used was a bit too thick for the job as well. I ran out of bias tape to trim the edges of the bag opening so when I put the quilted inner piece inside the green outer piece, I just folded the green edge over, and over again to hide the raw edges and top stitched it together.

You can see a peek of the strap, I just stitched a length of the bias tape onto some of the green fabric, this was done before I thought about wanting to trim the edge of the bag opening - silly me! Although in my defence it was into the am hours at this point!

I have now been requested to make another one in black and pink for Gemma (my step mum) so I will get some better photos and take some of the inside of the bag. This will be getting on for Xmas time though so keep an eye out in December.

Have you ever made a man bag? I'd love to hear about other adventures into masculine bag sewing!

Wednesday 28 August 2013

The Dreaded UFO Confessional...

Eek! So I rounded up a few of those things I have tried to forget about!

Exhibit A - U.F.O
. - Finger knitting to create bulky yarn to make an ombre blanket from. This has been about a year, it is just particularly boring and therefore neglected! I did one whole ball of yarn and started on a second, however, to make a blanket of reasonable size I need 4 balls at least!


Exhibit B - U.F.O
- This is the bottom part of a thrifted nightie, intended to make a slip. All I have to do is elasticate it. That is it. And it has been lying about for over a year!


Exhibit C - Repair - This top has an inch long split in a seam near to one of the armpits. Will take seconds, yep mere SECONDS(!!!) to run a few stitches over it. Been in the pile for 8 months. I am ridiculous!


Exhibit D - UFO - This is the back of a piece of bunting made to join in the Lincoln WI group bunting. All I need to do is cut those blue lines to remove some sequins, steam/ gently press the triangle, then reattach the sequins individually. I also need to embroider my name onto a second triangle to be the backing. Granted this is more than a few minutes worth of work, however, I did the embroidery on fathers day weekend back in June and really should have got my butt in gear!


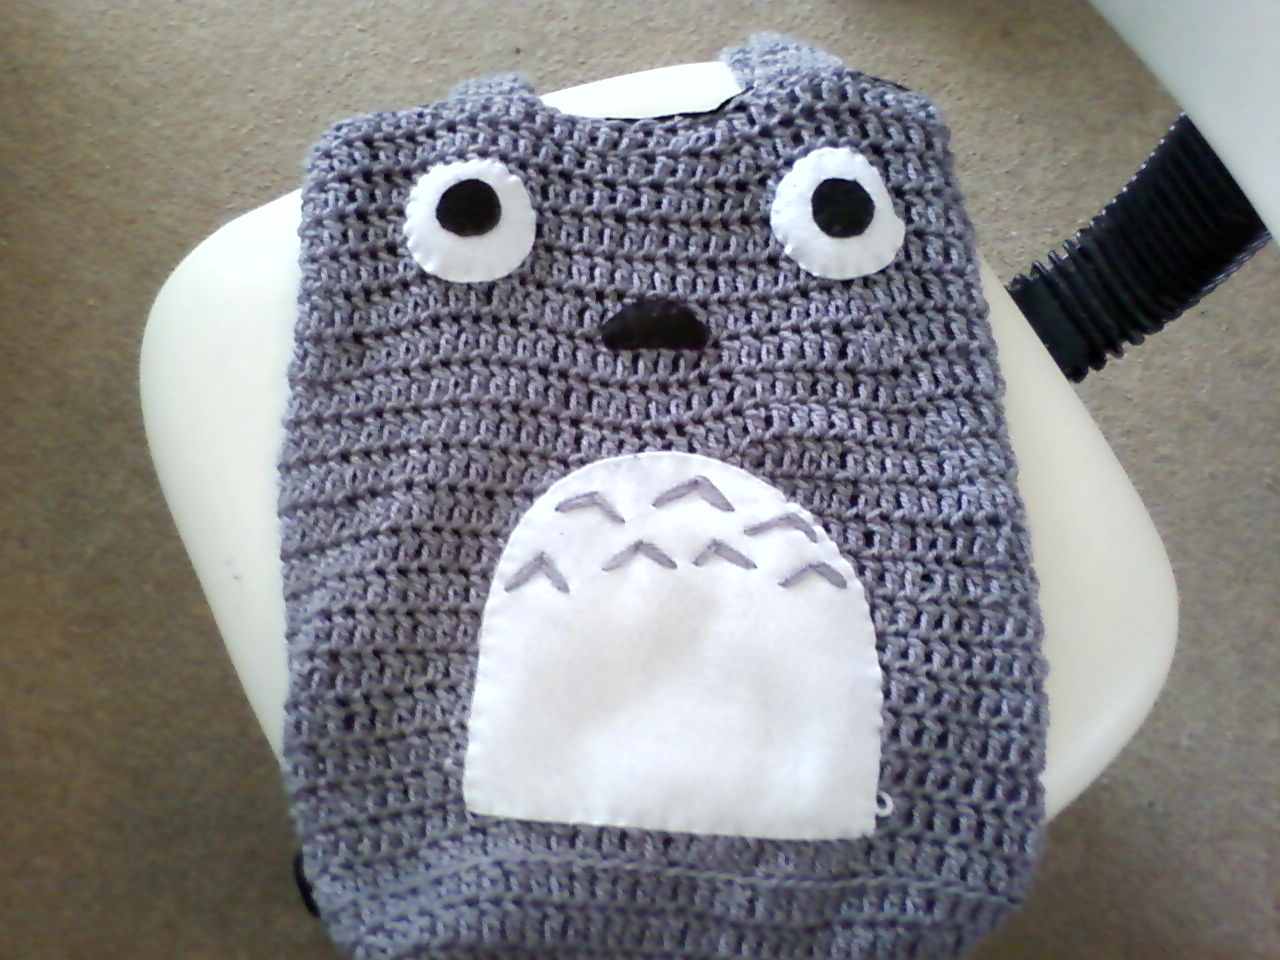
Exhibit E - UFO - I have blogged about this before, it has barely progressed from there! What can I say, it takes ages and involves large swathes of the same colour in the same stitch. Yawn.


Exhibit F - U.F.O This is a kimono sleeve shrug. Or at least it would be if I finished it! It is very wide and the bobble stitch takes ages to knit. So it will take many hours to finish it, and doing a metre(ish) of stocking stitch before going back to painfully awkward bobbles is not making it very endearing!


Exhibit G - U.F.O.
- This is a crochet shrug I made the pattern for, all it needs is two crocheted strips to attach for ties. It will take all of 10 minutes, then I can wear it! It is made from gorgeous (but sadly discontinued) yarn that I was so excited over, then I just never finished it. Once it is done I can photograph it and put the pattern up.


Exhibit H - U.F.O. This is another neglected piece, I mentioned in my last post about it that I didn't know what to do with it, I still don't!


Not Pictured- A pocket repair on one of the other half's shirts, a seam repair on another one.
A tea cosy for a competition that I can't post up until the competition has started.
A recently started knitting project that I will be blogging about later.

I would lie and say it isn't too bad.... Namely because I'm sure there are more lurking hidden away in corners!

How many U.F.O.s do you have?
Don't forget to grab yourself a button if you would like to join in!


Grab button for PIN UP CRAFTS
<div class="PIN-UP-CRAFTS-button" style="width: 200px; margin: 0 auto;"> <a href="http://pinupcrafts.blogspot.co.uk" rel="nofollow"> <img src="http://img.photobucket.com/albums/v391/simbelmyne665/Blog/buttonufo.jpg" alt="PIN UP CRAFTS" width="200" height="200" /> </a> </div>

Thursday 22 August 2013

Patchwork Pot Holder

The Lincoln WI has its own offshoot craft group one Saturday a month at a local community cafe called Revival. Sometimes we bring our own projects in to work on, other times we have guests who teach us something cool. One Saturday it was a patchwork workshop, which I was very much looking forwards to as patchwork is something I haven't delved much into due to its fiddly and time consuming nature (or what I perceive to be time consuming and fiddly!).
 
We learnt a cool technique that can be done by hand (which we were) or machine. You basically sew two squares right sides together round the edges, snip a cross through the back, press, repeat with a larger square - et voila! You will have a fancy looking patchwork square!
You then pin a patchwork - wadding - backing sandwich together and stitch through all the layers in a manner pleasing to you.

I chose to add bias binding to mine and stupidly did not round the corners to make it look neater. It has dodgy top stitching but I will lie and say it adds homemade charm ;)
It has a little hanging loop on one corner as a pointless accessory due to its home in a drawer. I could tell additional lies that it enhances the aesthetics of the piece and makes chucking it in with the tea towels so much easier... but my nose doesn't need to get any bigger ha ha!

I will do a photo step by step tutorial thing on this method as it will be easier to follow than my mumbo jumbo description above.

If you haven't done patchwork before I highly recommend having a go this way, the speed of the results will be encouraging, and uber high precision is not as important as hexies or such like.

Adios! xxx

Tuesday 20 August 2013

Cute Pencil Case

Hello everyone!
I'm sure you have seen those picture tutorials on Pinterest where there is no instructions just a series of self explanatory photos? Well here is my attempt at one!

It is a bit wonky (as comes as standard with my sewing) but considering I just winged it and drew an estimated shape on some a4 paper, it isn't too bad!

I made the bias binding myself from some scrap red linen.


The inside shows my wonky quilted effect lines, I didn't think to use a red bobbin, clearly I was having a moment...

The bottom is a bit misshapen as well.


Overall I am pleased with the result, not bad for a 100% winging it project! I also just really needed a pencil case for going to OU tutorials, having loose pens rolling round in my bag didn't seem like a good idea.

I would like to make another one at some point, perhaps a bit bigger though. They could be turned into make up bags, glasses cases, even a clutch bag. If you would like to see the original pin, it is on my projects board HERE.

Saturday 17 August 2013

W.I.P. / U.F.O. Hall Of Shame!

This will be a new feature here at Pin Up Crafts, first and foremost it is to try and force myself to get these projects finished with some good old social pressure!

We all have them, we all pretend they don't exist, but I *will* tackle them! So how will it work? I think it would be best to document every last one lurking in the corners and hiding in boxes, then do a monthly report on progress made.

If any one would like to join in then let me know in the comments below, and I will add you to the Hall of Shame page you can see linked at the top of my blog beside the Special Links tab. Together we can do it!

So watch this space for my U.F.O. confessional post, I'm not looking forwards to discovering the true extent of my lazy/ distracted ways though!

Feel free to grab a button if you are wanting to be in the Hall of Shame!


Grab button for PIN UP CRAFTS
<div class="PIN-UP-CRAFTS-button" style="width: 200px; margin: 0 auto;"> <a href="http://pinupcrafts.blogspot.co.uk" rel="nofollow"> <img src="http://img.photobucket.com/albums/v391/simbelmyne665/Blog/buttonufo.jpg" alt="PIN UP CRAFTS" width="200" height="200" /> </a> </div>

Wednesday 14 August 2013

Extra Slouchy Beanie Hat Crochet Pattern

When I was making the hats and scarves for the homeless I ended up making not one, but two beanie hat patterns. This was the first, a VERY slouchy beanie! I have got all my hair tucked up in the bottom of the hat and anyone who knows me will tell you I have a LOT of hair!


You can get a better idea about the size of this hat by the silly pic I took when I was messing about!


Anyway, enough tomfoolery, here is the pattern! I used regular DK wool, it takes around 50g of wool and I used a 4mm hook.
The pattern is written using UK terms and hopefully the way I like to set out my patterns will be easy for everyone to follow. Any problems then just leave me a comment and I will get back to you as soon as possible.
DC = Double Crochet, INC = Increase, rnd = round, TR = Treble crochet, DEC = Decrease, numbers in brackets are the total number of stitches.

1) DC 5 in magic ring                                        (5)
2) INC rnd                                                         (10)
3) INC rnd                                                         (20)
4) (TR, INC) rnd                                               (30)
5) (TR 2, INC) rnd                                            (40)
6) (TR 3, INC) rnd                                            (50)
7) (TR 4, INC) rnd                                            (60)
8) (TR 5, INC) rnd                                            (70)
9) (TR 6, INC) rnd                                            (80)
10) (TR 7, INC) rnd                                          (90)
11 - 16) TR rnd                                                 (90)
17) (TR 7, DEC) rnd                                         (80)
18) (TR 6, DEC) rnd,                                        (70)
Slip stitch x 2 then finish off, weave in the loose end.

Enjoy! Again, if there are any problems let me know! I am also interested in how other people find reading patterns the way I set them out so give me some feedback please folks!

P.S. I am a big fat liar, I actually made three beanie patterns, one was just for me though!


Linked up to - Wicked Awesome Wednesday @ Handy Man, Crafty Woman, Think Pink Sunday @ Flamingo Toes

Monday 12 August 2013

Sewing And Body Image - My Two Pence

Sewing blogs periodically come around to this issue, and I guess I am jumping on the proverbial bandwagon now as my own body is something I am particularly struggling to deal with at the moment.
Last week I read THIS article on the Guardian website, written by a lovely blogger I follow, Karen at Did You Make That? where she talks about how making clothes from scratch freed her from the tyranny of ready to wear sizing numbers (12, 14, 16 etc) and let her appreciate the uniqueness of her body, perfect looking to others or not.
I have to confess my own thoughts couldn't be more different. Those tape measure numbers were/are
horrible. The first time I sized myself up for a pattern (free from Prima magazine, a much appreciated gift from my mother) I cried. At that time I was fitting into a size 14/16 bottom half and my top half varied with fabric due to my overly large bra size. The bloody tape measure told me to cut out the pattern larger than they had graded for. And the patterns go up to size 20. So I cut out the 20 figuring I would just use a smaller seam allowance and basted the bodice together, then basted on the skirt. I tried it on and it turned out to be huge. Really huge! I was relived by this but also confused at the relationship between the tape measure and the non stretch polycotton sack in front of me.

In time I came to understand about ease, big four patterns being very generous with the ease and how a perfect fit involves tweaking everything in relationship to my own shape and proportions. I also realised just how much the high street likes to massage the fragile egos of their clientele. I mean everyone knows a M&S 12 is much larger than a Topshop 12, but most people don't realise how much these sizes differ from pattern sizes.

Even now though, despite improved knowledge, I still get a sense of deep dread when I read those numbers off. It makes everything so much more real. My work trousers are sized in cm, this is just as depressing, it is a big number. I know that I am overweight, and until some personal circumstances interfered, I was slowly losing the weight to feel better about myself. but those numbers still haunted me. I had a hard time shifting the weight despite a 1 hour, 5 times a week gym habit (and no, I wasn't pigging out) and it took a long time to notice anything. I did track my actual weight loss, but I was primarily concerned with those darn numbers.

I guess what my point is really, is that personally, hiding behind that M&S 14 label (despite knowing its lying ways) makes me feel better that those raw, real, numbers. Even if no label = no evidence of size, I know, and my own opinion on my body is the only one that is truly important.


Thankfully cats do not have these worries!
(This is just an unfortunate angle, my cat is a chunky monkey but not that bad!)

Saturday 10 August 2013

Did You Ever See A Llama....

....Kiss a llama, on the llama, llama's llama, taste of llama, llama llama duck.......

When I was in my teens (which feel like a rather long time ago!) I was a little obsessed with that wonderful gem about llamas, and with llamas in general. Now I have aged, the song is quite clearly annoying but my love for llamas is still there. Although I prefer alpacas and wish to smush my face into their soft fuzzy bodies!

But I digress, I took an exam back in June (Which I passed thank frick!) and as a celebration I decided to make a crochet llama as I saw a pattern on Pinterest. As you do. However I had also just brought a 9mm crochet hook which I was itching to use. The logical result of this was to make a GIANT LLAMA! I didn't have any super bulky wool so I just used 2 balls of cream DK and a ball of cream aran all at the same time, and with the brown yarn I just cut three lengths off to use simultaneously. So after a little bit of hooking I ended up with this beautiful bad boy!


He stands around 19" tall! How awesome is that?! I sewed his legs on a bit dodgily, but he still stands up so I haven't bothered to change them, if I make another one I will just be more mindful of the placement.
If you would like to make your own regular or giant llama toy, the pattern can be found HERE at crochet_goods.
If you do make one then I would love to see it, link me up in the comments!

Tuesday 6 August 2013

That Mod Podge Shoe Thing

I jumped on the bandwagon and tried that mod-podge shoe nerdifying thing. I did this quite a while ago and never got around to blogging about it. It came about in the usual way of it being really late at night and me being on my own and deciding it would be the perfect time to try out that time consuming craft project I pinned months beforehand.

So I got out a stash of Neo magazines and set about snipping a pile of cute pics small enough to fit on the shoes, as well as a pile of multi coloured bits to be fillers.
As you can see they turned out all bright and funky, and despite them not being the kind of thing I would normally go for, I thought they looked pretty awesome and were definitely going to be worn.

Front view - I love the Junko Mizuno mermaid picture <3 br="">
Side view one
Back view
 Side view two - showing some less than perfect sizing on the back shoe.
If you know me, you will know that sometimes when I get the urge (you know that urge) to make something, I often don't think about it practically and end up with some pretty silly things happening. The biggest mistake was using magazine pictures instead of comic book pages. The magazine pictures are thicker and do not "become one" with the shoe fabric. This was not helped by a big shoe issue - these were shiny shoes and the pvc cheap nasty surface was not the best for gluing things onto, even mod podge is weak against them. So when I finished applying the pictures (some which were just unsuitable which I should have replaced, as in the above picture) and slapped on a couple of coats of mod podge (gloss) and let them dry, I was about to encounter my next set of problems.

First there was an incident where the shoes were placed too close together (they were dry, it was about a week after) and they fused together, this resulted in some of the mod podge coming away when I pulled them apart. Then when I started walking about in them to wear them in a bit (I had only worn the shoes a couple of times before so they were still a bit tight and ouchy) the subsequent creasing made one of the pictures come away. This showed me that I could effectively just peel the whole lot off as they weren't really bonded to the shoe as I explained before.

Now I just have the shoes sat in my craft room being a decorative feature that nobody except myself ever sees. And I am torn as to what to do with them. Do I rip it all off and try again with comic book paper? Or keep them as an odd ornament?

Suggestions welcome!

Saturday 3 August 2013

Is that a tumbelweed I see....?

Yes, as per usual the blogging has been neglected, but I will make yet another attempt to be a good blogger!
I have been going about my crafty business so I have things to share with every one.
Posts will be coming soon!

Wednesday 22 May 2013

Shorts to Skirt Upcycle

Good afternoon folks!

First of all I would like to say how sad I was to see the news about the terrible destruction in Oklahoma City, such a heartbreaking thing to happen :(

Today I am sharing a little project from last year, you know how on the ball I am with these things. A while back I got some weird shorts from a charity shop (I have since discovered they are gauchos) that I liked but could not find anything to wear with them that looked okay. So I thought sod it, I'm going to have to make them into a skirt. And I did!

I forgot to take a before picture but just imagine some really odd wide legged knee length shorts and you're good to go. I unpicked the inside hems and just re sewed them to meet like a skirt. You have to chop the little crutch bit out but otherwise there isn't much to do other than getting the join smooth.
I top stitched for strength along the front and back seams. There is also one of those vents (? is that the right term?) at the back to allow leg movement - always a useful thing to have! I added the lace at the bottom to jazz it up a bit, I think it works quite well!


I even covered (badly) my raw edges as it was fraying like a S.O.B!


I haven't worn it many times, maybe three or four, but I do still like it. I wore it to my first OU tutorial thinking people would be all smart casual, I might have made too much of an effort....and the top I paired it with is actually a bit see through...oops! So errmm yeah, librarian chic... I rocked it baby ha ha ha! ;)

Friday 17 May 2013

Foxy Lady!

Hey guys!
I thought I would share with you a project that was initially conceived over 2 years ago but only completed last autumn!
Meet my fantastic dead fox scarf!

He is very long and his paws have little bags of rice in to make them hang properly, although the wind does like to pick them up and swing them right in my face...

I love his tongue the best!
He is crocheted with a double layer so he is super cosy, perfect for the extended winter we have just suffered here in England. I wish I had the foresight to make part of his face cream as well but I tend not to overly plan what I want to make as I am a bit impatient with things like that.

In typical fashion when I came up with this idea I had a look around the internets and found nothing. Since then these style scarves are everywhere. Moral of the story - Don't take so bloody long making things! Although the length of this bad boy meant that even a hardened crocheter would have struggled to crank it out quickly even if they weren't so lazy about it!

Has any one else made any funky scarves? Be sure to link 'em up below if you have!

Sunday 12 May 2013

Something Old into Something New

Here are a couple of things that older readers might  recognise...


This skirt used to be a bit longer and look like THIS. I simply chopped some fabric from the top and sewed on a length of elastic as a waistband.

This skirt used to be a DRESS and was just hanging around unworn in my wardrobe. I chopped it in half and made casing from some scrap white fabric to house some elastic. I also put in a small amount of lining just to stop it being so see through. I wear this regularly now it is in skirt form, so don't be afraid to chop up your hard work into something more suitable - what a waste to have things unworn and unloved!

Thursday 9 May 2013

Current Embroidery

Hello!
Well this squiggly mess is my latest embroidery project. Clearly it involves boobies in some capacity (I just started in the center honest!)... It is for the back of a hoodie I bought a while ago that was all plain and black and dull, so I thought I would embroider an applique for the back. I am using short stitches this time to avoid any sagging like on the zombie embroidery.


I will keep you all updated and post more pics when it is a bit further along.

~ lucy x

Monday 6 May 2013

Dress Upcycle

Happy bank holiday everyone! I hope all of the UK readers are enjoying the sunshine! I am stuck indoors doing a lengthy assignment - booo!
Just a quick post to share an upcycle I did in January for a works retirement party. Ignore the dodgy hair, I have no idea what I was thinking with that parting! I do have some before pictures of me wearing this dress 8 years ago but I am way too embarrassed over them and I also can't be arsed to scan in a photo. The dress in question was from when I was a bridesmaid at my Mum's wedding. It was plain purple and was tea length. I looked like thew worlds biggest (quite literally the biggest) muppet. As you can see I chopped off about 8-9inches off the bottom to make it a far more flattering above the knee style, perfect for us shorties who like to give an illusion of being taller. I also handmade 35 black acrylic net flowers with beaded centres that were hand stitched around the bottom.
Recognise this Mum?!
You get a better idea of colour here, it also looks a lot shorter when hanging up but I assure you I am only 5ft 2.5" so this is not that bad! I rolled the hem very painstakingly but it looks a bit shoddy so I didn't want to photograph it - good job I'm not on the Great British Sewing Bee isn't it ha ha!

A bad close up of a flower, simple to make, I'm sure you have seen tutorials for them around the blogosphere/ Pinterest.

All together a successful transformation. Just goes to show that sometimes you really do need to hang onto that thing in your wardrobe for a bit longer!

Wednesday 1 May 2013

Zombie Pin-Up Embroidery

Hello everyone!

Remember when I posted about THIS?

Well I did finish off the embroidery! Obviously it is not entirely finished (and in need of a good wash and iron!) as it was meant to be a tote bag. It is currently a sack.... I am undecided on what exactly to do with this now, the bag idea is still in the running but it could also be a cushion, dodgy wall art... or a sack.... The problem lies with the satin stitching on the lettering, it kinda sags a bit now it is no longer in the hoop, so I do not know how to remedy this other than turning it into something that is permanently stretched taught.


Overall I am quite pleased with how it has turned out, the colours go well together and I managed to keep it fairly neat. The face isn't as good as I would have liked but err zombies look a bit like a shovel hit them in the face right?!?!


Any one else out there embroidering for the dark side? Let me know!

Monday 29 April 2013

Totoro Tote Bag!

One night when I was feeling super blue and was unable to sleep, I decided to be pro-active and crochet up this cheeky little fellow! I didn't use a pattern (and unfortunately I was not in the right frame of mind to have even thought to write down what I did) but it was a straight forward double crochet (US single crochet) extended oval base and then rounds of treble crochet (US double crochet) until I reached the desired height. I used treble crochet for two long straps. I appliqued the eyes, nose and belly (with yarn used to make the little arrow bits) using felt. The bag is also lined using scrap t-shirt fabric. I keep meaning to make him some whiskers so the poor people who have no knowledge of this magnificent beast stop thinking he's an owl.


What a cutie!


Sunday 28 April 2013

Cute Cat Embroidery

 This is based on a picture I found on Pinterest from Pusheen and thought would be a cute way to cheer up my Dad :) Which it did and it is still (5 months on) residing pride of place on top of the TV!

I used my usual combination of satin stitch and back stitch, with some french knots for the eyes. I just used some random polycotton I had lying around and when it was done I put it into a simple wooden frame.


Hope you are all having a lovely day!