Showing posts with label Crafty Tips. Show all posts

Thursday, 13 March 2014

7 Things You can Learn From The Sewing Industry


Hello everyone! Today I thought I would share with you a few tips that I have picked up whilst sewing in an industrial setting. I am no true veteran, nor am I an expert, but these are a few things I have picked up along the way that you might find useful :)

1 - Don't use as many pins!
I know that setting in a sleeve is best done with careful pinning, but for the most part, us home sewers are used to pinning everything abundantly. At work I have 12 pins in my pincushion (four of them are being used to attach my secret T-Rex to the other side of my frilly pincushion ;) ), they get used very rarely and off the top of my head I can only think of 3 or 4 reasons I use them. Most of the time it is on knee pad pockets (I work with industrial workwear mostly), and second most often is to hold something out of the way that keeps flopping down into my sewing area. If you pin everything, I challenge you to have a go at doing some straight seams without pins, like the sides of a skirt, or a trouser leg. I made a pair of pj bottoms the other day and didn't pin them at all!

2 - Use a craft knife instead of a seam ripper.
It is scary to put a knife to fabric the first few times, and I urge you to exercise caution when you are getting used to it - I don't want the blame for sliced fingers or sliced garments! But when you are unpicking a whole hem, especially on heavier fabrics, a craft knife just glides straight through and makes small work of overlocking etc. (Maybe the Sewing Bee contestants could have done with this tip!) Just start off by gently "stroking" the stitching with the blade and gradually increase the pressure until you are comfortable with using a bit more gusto. Be careful, but give it a try! Saves so much time in the long run.

3 - Replacing a zip is not scary!
Seriously, don't throw away those favourite jeans, or that cute jacket because the zip has broken. Take your time and remove the broken one, look at how you are taking it apart, and put a new one in. Once you get the hang of it, it will be no more daunting that putting one in a garment made yourself.

4 - Likewise for taking in trousers!
If you want to extend the life span of a pair of trousers that are getting a little bit loose, or just improving the fit of a new pair, then taking them in is a must. The easiest way is to unpick the waistband 3-4 inches either side of the butt seam. Then taper from about 2 inches above the crotch seam all the way to the top of the waistband. Fold the excess waistband to the inside, sew a seam down it, and sew it back round the trousers, folding the flap of taken in fabric the opposite way to the excess waistband fabric to minimize bulk. If you are certain you won't be gaining a few pounds then by all means cut it off! This will only work to a maximum of 2 inches on the fold (4 inches out of the waistband) as it starts to look a bit weird after that.

5 - Mark your hems with chalk.
This goes along with the use less pins really, but when taking up sleeves or trouser legs, just mark the fold line with a few dashes of chalk. No stopping to take pins out, just fold over and go!

6 - Put your pedal to the metal...
If you ever get the chance to use an industrial machine then you will notice how much faster it is than a domestic. Scary, but once you're used to it, sewing at home just seems to go so slow! I would reccommend to anyone that they practise going a bit faster, even if it is just for straight lines, it will get your garment together so much quicker allowing you to be more productive in the long run.

7 - Have a ruler put on your sewing table.

If you're lucky enough to have a dedicated sewing space with a table not used to host dinner parties, I would recommend getting either a transfer of a tape measure put on the edge of your table, or have a meter ruler attached. It makes it so much easier to check inside leg measurements (I actually have mine sharpied onto my sewing table at home!), zipper lengths, button widths... you name it! It is a small thing that will make thing a bit easier in the long run. It also has the added advantage of not stretching out like a tape measure will after time.

Well that's all I can think of at the moment, I hope some of them are at least a little bit of use to somebody! Feel free to leave more suggestions in the comments :)

Sunday, 8 September 2013

DIY Dressform

Hello everyone, this is another very quick post, and it is in response to the lovely Kelly over at Make, Sew, Do who asked in a post I just read, have you ever made a dressform?

The answer to this is yes! I made one a couple of years ago. Sadly I found the gaffer tape method to be a poor choice for keeping its shape and it has been disassembled and recycled/binned since the beginning of the year due to its lack of function.
So just for a laugh at my own expense, here is the evidence!

Apologies for the middle finger, I was not wanting to have a photo at the time!

Maybe one day I will make a gummed paper version, although maybe setting aside a little every month for a proper one some time next year is a better plan :)

Sunday, 1 September 2013

4 Suprising Places To Buy Yarn!


 Hello everyone!
Just a quickie here, but I thought I would share with you four places to buy yarn that you wouldn't have expected. Well, I can't promise that every store stocks it but it is certainly true for the ones in my town :)

1. Wilkinsons! Yep, the high street fave stocks yarn. Not the largest selection but you can still pick up some cheap DK weight for a bargain price, £1.35 for 100g according to their website.

2. B and M Stores - They had a good variety of colours, if memory serves right they stocked 100g DK and Baby yarn. Their website doesn't list it but I don't remember it being expensive.

3. Poundland - They stock DK weight in several colours, both in plain and sparkly. They are 3 for 2 and 50g balls. I have used this yarn and it is quite nice.

4. The Works - They stock a few different types of yarn, off the top of my head there is 100g DK and the yarn which is thin with pom pom type balls on it (I can't think of it's proper name!) along with another novelty type yarn also. The DK is £1.25, I'm not sure about the rest.

Are there any places you buy yarn that you wouldn't expect to find it in? Let me know in the comments!

Monday, 9 April 2012

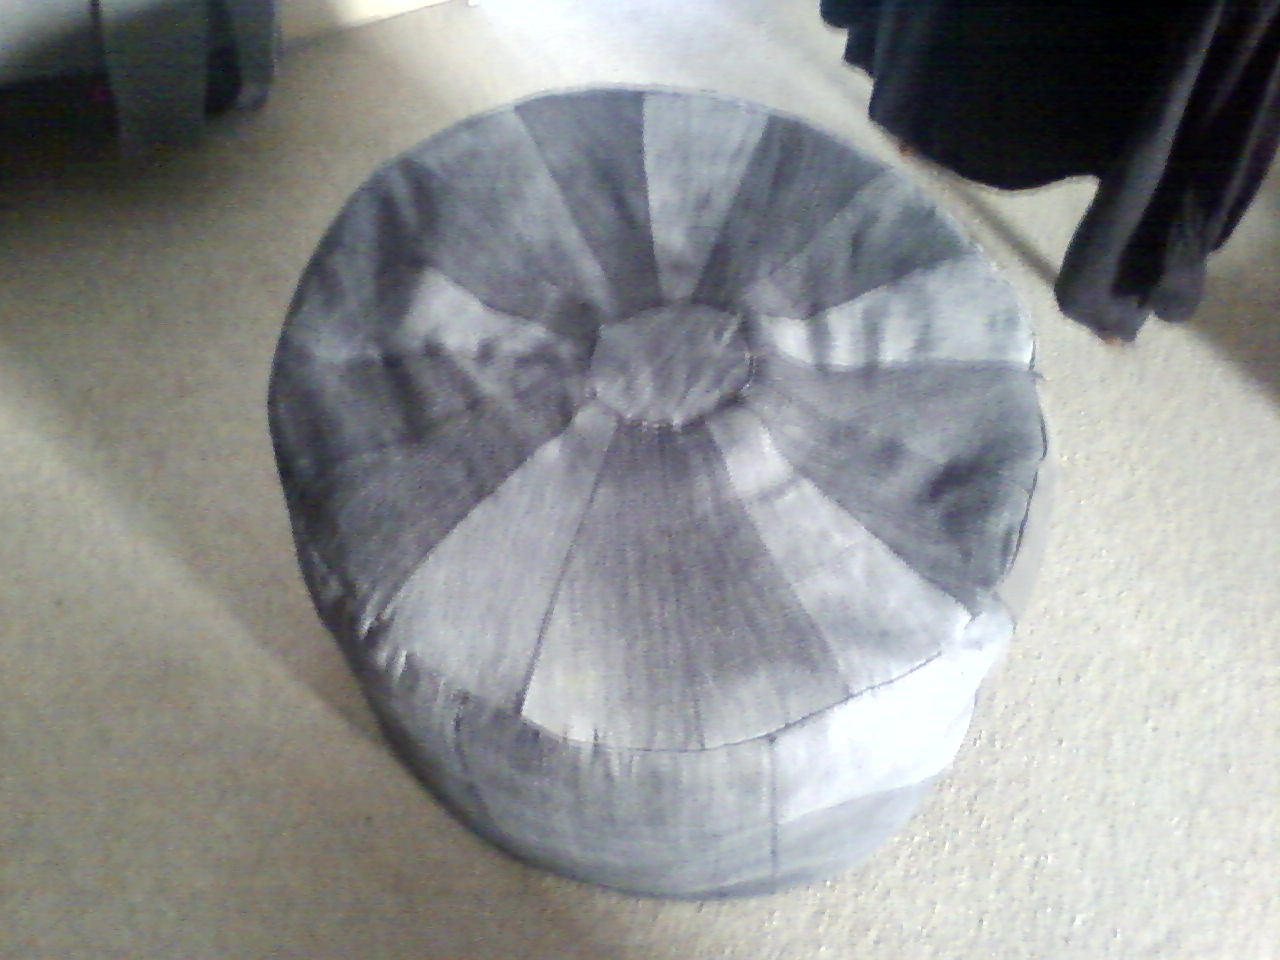
Upcycled Jeans -> Pouffe - No Spend Project!

Hope everyone is enjoying their bank holiday weekend!
Here is a little project that was 90% completed on new years eve (Yep...I'm that cool ha ha ha!) and finished about a month ago. It is a pouffe made from old jeans, it is completely eco/ purse friendly though because it is filled with spare bedding - duvets and pillows. I was actually going to buy some of those vac pack bags to store the duvets in as they were getting on my nerves being thrown from one cupboard to the next taking up so much space. We hardly use them and if we need them then they can be whipped out of the pouffe ready for action!
As you can see from the pictures, I made up a large circle out of wedge shapes cut from the old jeans and disguised the hole with a circle making an attractive sun pattern. I basically sewed the pieces together with a straight stitch then used a zig zag stitch and top stitched for strength. It is, after all, going to have arses a plenty on it.


The side panels were made up of alternate rectangles and two piece rectangles, there is only so much fabric on a pair of jeans so I had to fit bits in where I could! I seamed it together as before then zig zagged the hell outta it as these joins will be under more strain.


For the bottom I used larger wedge pieces, this was where the 90% complete stage was, I wanted to use it new years eve and therefore safety pinned the bottom up... and left it!
Eventually I got around to finishing it and sewed on Velcro to fasten the flaps down, it is pretty strong, it doesn't fall open when it is picked up.


Well, I would recommend everyone make one, it is a bit time consuming but it is satisfying to know it cost nothing and is a handy storage facility! You could try making a smaller one as a footstool, perhaps fill it with a few pillows if you don't have spare duvets kicking around.

Hope this has given some inspiration on upcycling jeans :)

Happy Easter!

Monday, 26 March 2012

Wine Bottle Wrapping Tutorial

Hello folks! If you know me personally you will most likely have received a spiffy looking gift at some point. Not to toot my own horn too much but I am at one with the gift wrap, I make my gifts look nice because I can't always afford an expensive gift and the wrapping distracts from this ha ha ha!
Here is a little tutorial on how to wrap up a wine bottle, one of those tricky shapes that come up time and time again and you don't always want to leave it naked in a gift bag!
Please ignore the state of my craft room carpet, this was spur of the moment and therefore I didn't get the Dyson out first!

You will need some tissue paper, sellotape, some sort of string, curling ribbon or ribbon and any decorative bits and bobs if you want to bling it up.

STEP 1
Start off with the rectangular piece of tissue paper in front of you with the longer side closest to you. Bring the bottom right corner up towards the top left corner until you have made this funny mountain shape. Turn the paper around so that it is facing you like it is in the picture.


STEP 2
Place your bottle about 2 inches from the bottom of the paper and about a third of the way in from the edge.

STEP 3 
Wrap the paper from the left hand side around the bottle then start rolling the bottle round, take care to keep it fairly tight.

STEP 4
Before you roll it too far along, tuck in the bottom of the paper. It doesn't have to be perfect!

STEP 5 
Fold across the end of the paper as shown. Then finish rolling up the bottle.
Secure the end with a small amount of sellotape, I would normally use double sided but it doesn't seem to hold the tissue paper in place very well. Use a couple more small pieces to secure the bottom, you don't need to go mad with it as the bottle will probably be upright which keeps it secure!

Your bottle should now look something like this!

STEP 6 
Tie the neck of the bottle with the string or ribbon.
Add bling.
You can't see in this picture but I added a large butterfly sequin to the neck where the curling ribbon is tied using sticky pads and glued some sequins onto the tissue paper.


I hope you have found this to be helpful! It isn't anything spectacular but is quick and simple yet looks really pretty. Obviously you can do this in any colour and decorate any way you like :)
I think it would look nice with a wide fabric ribbon tied around the neck in a bow. You could theme it for a wedding or do some whisky 007 style by making it look like a tuxedo with a bow tie! (This is just how randomly my ideas flow, I can't help it!) If anyone actually does this you totally have to let me know!!!

Have fun!

Sunday, 6 March 2011

Almost done!

Well in record timing I have actually managed to sew all corresponding pieces of the dress together, trim all seams, hem up the bottom, iron it, sew buttons and button holes, create a custom bust piece and add a tie to the back to deal with the slight bagginess!

It was the first time I have ever made button holes with a sewing machine, thankfully I practised on a scrap first rather than diving headfirst into it! The instructions that came with my lovely Janome were really well explained and the diagrams were clear too. Bit nervous about using the seam ripper to open them up in case I cut the stitching by accident but it was fine, I managed to keep inside the gap. I also have a crafty tip for everyone that came around whilst making this dress......
**If you use the insides of cushions for stuffing things you make then keep hold of the outside part, it will save you money on buying interfacing stuff and result in one less thing thrown in the bin!**

I love a little way to use up unexpected items and save a few pennies on materials too :)

Well anyway, back to the dress, all that is left is to sew on a popper to stop a little boob flashing and a few stitches to bring the bust part in a little tighter then I'm done!
It looks really cool, kind of a rockabilly/pin up look meets pirate wench.... which equals cool to me, sod what anybody else thinks!
I'll go into more detail about adjustments/ problems etc when I post a picture up of the finished product.