Seriously guys check out these beauties I found on Pinterest!!
These are all by designer Judith Leiber, and I am loving the unusual bling-tastic designs!
I doubt I will be able to hand-make anything this fancy, but I sure will be keeping an eye out for an old clutch I can bling up!
Monday, 17 March 2014
Thursday, 13 March 2014
7 Things You can Learn From The Sewing Industry
Hello everyone! Today I thought I would share with you a few tips that I have picked up whilst sewing in an industrial setting. I am no true veteran, nor am I an expert, but these are a few things I have picked up along the way that you might find useful :)
1 - Don't use as many pins!
I know that setting in a sleeve is best done with careful pinning, but for the most part, us home sewers are used to pinning everything abundantly. At work I have 12 pins in my pincushion (four of them are being used to attach my secret T-Rex to the other side of my frilly pincushion ;) ), they get used very rarely and off the top of my head I can only think of 3 or 4 reasons I use them. Most of the time it is on knee pad pockets (I work with industrial workwear mostly), and second most often is to hold something out of the way that keeps flopping down into my sewing area. If you pin everything, I challenge you to have a go at doing some straight seams without pins, like the sides of a skirt, or a trouser leg. I made a pair of pj bottoms the other day and didn't pin them at all!
2 - Use a craft knife instead of a seam ripper.
It is scary to put a knife to fabric the first few times, and I urge you to exercise caution when you are getting used to it - I don't want the blame for sliced fingers or sliced garments! But when you are unpicking a whole hem, especially on heavier fabrics, a craft knife just glides straight through and makes small work of overlocking etc. (Maybe the Sewing Bee contestants could have done with this tip!) Just start off by gently "stroking" the stitching with the blade and gradually increase the pressure until you are comfortable with using a bit more gusto. Be careful, but give it a try! Saves so much time in the long run.
3 - Replacing a zip is not scary!
Seriously, don't throw away those favourite jeans, or that cute jacket because the zip has broken. Take your time and remove the broken one, look at how you are taking it apart, and put a new one in. Once you get the hang of it, it will be no more daunting that putting one in a garment made yourself.
4 - Likewise for taking in trousers!
If you want to extend the life span of a pair of trousers that are getting a little bit loose, or just improving the fit of a new pair, then taking them in is a must. The easiest way is to unpick the waistband 3-4 inches either side of the butt seam. Then taper from about 2 inches above the crotch seam all the way to the top of the waistband. Fold the excess waistband to the inside, sew a seam down it, and sew it back round the trousers, folding the flap of taken in fabric the opposite way to the excess waistband fabric to minimize bulk. If you are certain you won't be gaining a few pounds then by all means cut it off! This will only work to a maximum of 2 inches on the fold (4 inches out of the waistband) as it starts to look a bit weird after that.
5 - Mark your hems with chalk.
This goes along with the use less pins really, but when taking up sleeves or trouser legs, just mark the fold line with a few dashes of chalk. No stopping to take pins out, just fold over and go!
6 - Put your pedal to the metal...
If you ever get the chance to use an industrial machine then you will notice how much faster it is than a domestic. Scary, but once you're used to it, sewing at home just seems to go so slow! I would reccommend to anyone that they practise going a bit faster, even if it is just for straight lines, it will get your garment together so much quicker allowing you to be more productive in the long run.
7 - Have a ruler put on your sewing table.
If you're lucky enough to have a dedicated sewing space with a table not used to host dinner parties, I would recommend getting either a transfer of a tape measure put on the edge of your table, or have a meter ruler attached. It makes it so much easier to check inside leg measurements (I actually have mine sharpied onto my sewing table at home!), zipper lengths, button widths... you name it! It is a small thing that will make thing a bit easier in the long run. It also has the added advantage of not stretching out like a tape measure will after time.
Well that's all I can think of at the moment, I hope some of them are at least a little bit of use to somebody! Feel free to leave more suggestions in the comments :)
Monday, 10 March 2014
If you're crazy and you know it clap your hands....
*clap clap!*
I'm making a Puppycat.... a rather large Puppycat!
My own lack of foresight meant that a cat which is about 30cm in size in the original pattern made by the amazing Twinkie Chan, is now err bigger.... Who knows how big he will be in the end!
Sense told me to frog him and go smaller, insanity said (and i hate these silly phrases but it is the most appropriate thing here) F*** it - YOLO!
Stay tuned for the finished project (when I buy the whole of Lincoln out of white yarn!) and maybe I will make a little aubergine or Peon to go with him too!
I'm making a Puppycat.... a rather large Puppycat!
My own lack of foresight meant that a cat which is about 30cm in size in the original pattern made by the amazing Twinkie Chan, is now err bigger.... Who knows how big he will be in the end!
Sense told me to frog him and go smaller, insanity said (and i hate these silly phrases but it is the most appropriate thing here) F*** it - YOLO!
Stay tuned for the finished project (when I buy the whole of Lincoln out of white yarn!) and maybe I will make a little aubergine or Peon to go with him too!
Sunday, 9 March 2014
Ghostbusters Egon Amigurumi
This post has been sitting in my drafts for almost a year now, and I never expected the prompt for posting it would be the sad death of Harold Ramis :(
Egon is what my other half calls me when I wear my hair up in a rockabillly bouffant style, I forget normality sometimes and it can get a bit tall! Like smuggling kittens in it tall!
This was made in 2012 (yep, that long ago!) as a birthday gift.
He was easy to make, I just did a basic head, body and stumpy arms. The hair has a piece of foam inside to make it bouffant. To be honest the hair isn't very good but live and learn hey?!
From the back you can see I made the world's most basic proton pack, namely a rectangle with a little hose coming off it!
If there are requests I will dig out the pattern I made, but I think if you make ami's it is fairly self explanatory!
Egon is what my other half calls me when I wear my hair up in a rockabillly bouffant style, I forget normality sometimes and it can get a bit tall! Like smuggling kittens in it tall!
This was made in 2012 (yep, that long ago!) as a birthday gift.
He was easy to make, I just did a basic head, body and stumpy arms. The hair has a piece of foam inside to make it bouffant. To be honest the hair isn't very good but live and learn hey?!
From the back you can see I made the world's most basic proton pack, namely a rectangle with a little hose coming off it!
If there are requests I will dig out the pattern I made, but I think if you make ami's it is fairly self explanatory!
Saturday, 22 February 2014
Stripey Dress - Sweater Refashion
Hello!
Thought I would share a refashion that I did ashamefully long time while ago, before I got my overlocker last summer (Okay, this is from 2012, I admit it!!). It started life as a sweater type thing, huge with long sleeves. I was going to take pictures for a tutorial but I obviously forgot!
All I did really was to get a vest top that fits well and draw around it with some chalk, not including the straps and extending the bottom to make it dress length... okay, short dress length!
I then cut another panel out, around 6" wide. I cut up the middle of the dress and sewed in the extra panel. This made it not quite so much like being in a sausage skin, super tight fitting dresses are only for the slim and alas, I am not one of those girls!
Here is a close up of the straps, I cut out four long rectangles from one of the sleeves, and then sewed each pair together with the right sides together. I shaped one end to be rounded, just freestyled it as total perfection was not necessary! I then turned them inside out and attached them to the dress. To ensure they were the right length I sewed on both straps at the back and then trundled off into my bedroom to try it on and pin the straps in place at the front, I just looked in the mirror to gauge how even they were. They then got sewn down and buttons sewn on for decoration only. As you can see the raw edges aren't finished, they won't fray though so it's ok.
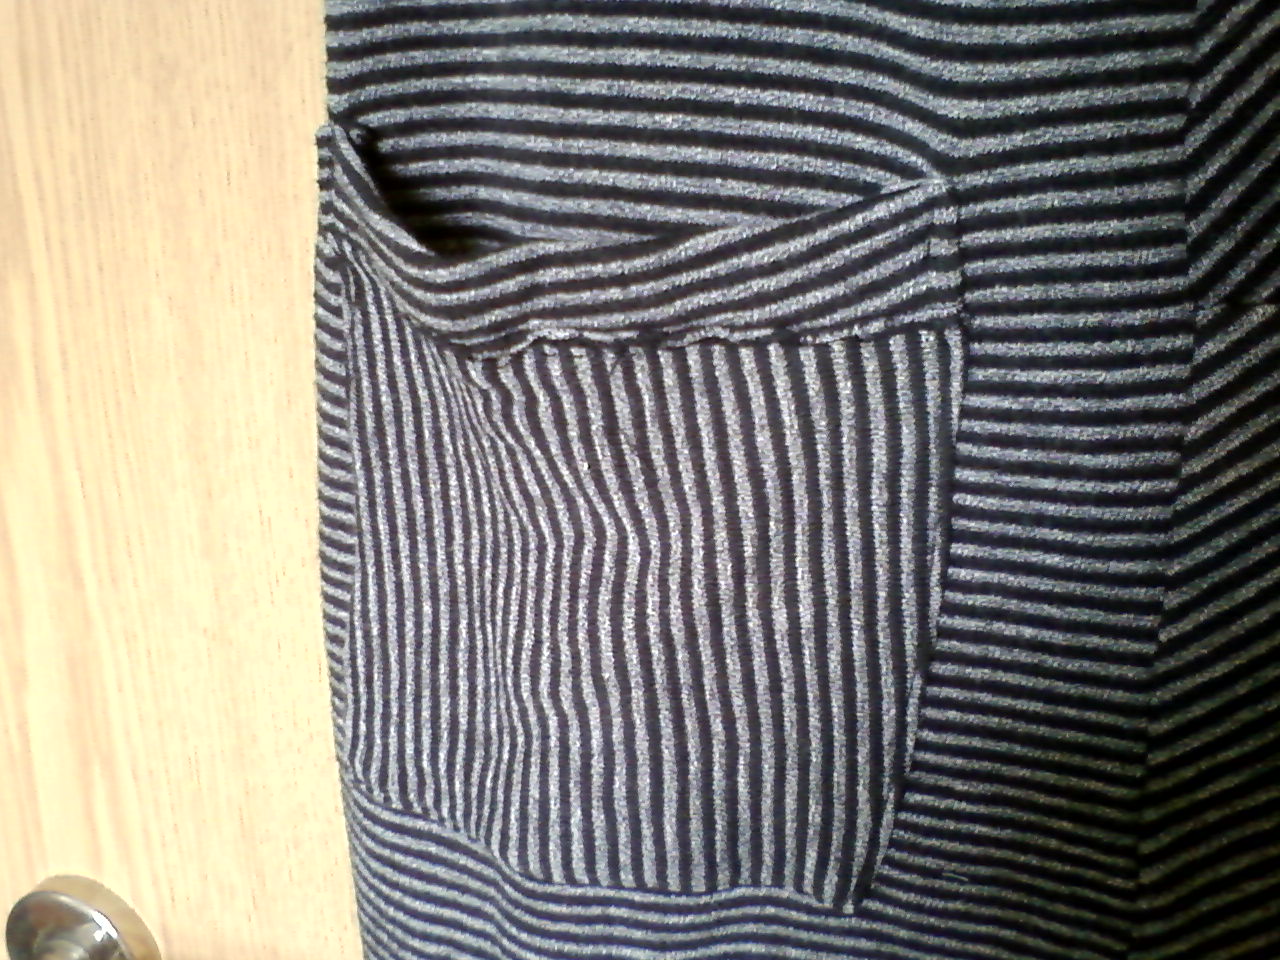
I then added some pockets because I love skirts and dresses with pockets on. They are infinitely more useful that way and if it is just casual every day wear then practical is always good! I cut out the two pocket shapes (I think I may have actually made a paper template shock horror!) and then a rectangular piece to strengthen and neaten the open part - I just sandwiched the pocket in there.
I sewed the pockets on using the regular patch pocket method.
So it was as easy as that! Don't be scared to refashion old/ thrifted clothes, even if they get messed up you haven't lost anything except your time and maybe a couple of quid! You will have gained experience even with something that turns out wrong and that alone can be worth it :)
Be brave and have fun!
Thought I would share a refashion that I did a
All I did really was to get a vest top that fits well and draw around it with some chalk, not including the straps and extending the bottom to make it dress length... okay, short dress length!
I then cut another panel out, around 6" wide. I cut up the middle of the dress and sewed in the extra panel. This made it not quite so much like being in a sausage skin, super tight fitting dresses are only for the slim and alas, I am not one of those girls!
Here is a close up of the straps, I cut out four long rectangles from one of the sleeves, and then sewed each pair together with the right sides together. I shaped one end to be rounded, just freestyled it as total perfection was not necessary! I then turned them inside out and attached them to the dress. To ensure they were the right length I sewed on both straps at the back and then trundled off into my bedroom to try it on and pin the straps in place at the front, I just looked in the mirror to gauge how even they were. They then got sewn down and buttons sewn on for decoration only. As you can see the raw edges aren't finished, they won't fray though so it's ok.
I then added some pockets because I love skirts and dresses with pockets on. They are infinitely more useful that way and if it is just casual every day wear then practical is always good! I cut out the two pocket shapes (I think I may have actually made a paper template shock horror!) and then a rectangular piece to strengthen and neaten the open part - I just sandwiched the pocket in there.
I sewed the pockets on using the regular patch pocket method.
So it was as easy as that! Don't be scared to refashion old/ thrifted clothes, even if they get messed up you haven't lost anything except your time and maybe a couple of quid! You will have gained experience even with something that turns out wrong and that alone can be worth it :)
Be brave and have fun!
Friday, 21 February 2014
Blogging...
....It would seem that I am stuck in between having no time to blog but being unable to give it up!
I even started a Kollabora account, but after a couple of days messing around with it have found that deserted too!
The lovely Rochelle over at Lucky Lucille has just posted about being in a funk, a very timely post as I am in the funk to end all funks right now and am finding it so difficult to do much other than aimlessly waste time. So I am taking her advice, and pulling myself out of it, one step at a time. Fingers crossed!
I even started a Kollabora account, but after a couple of days messing around with it have found that deserted too!
The lovely Rochelle over at Lucky Lucille has just posted about being in a funk, a very timely post as I am in the funk to end all funks right now and am finding it so difficult to do much other than aimlessly waste time. So I am taking her advice, and pulling myself out of it, one step at a time. Fingers crossed!
Monday, 21 October 2013
My Dream Come True...
It is no secret that I am in love with Dr Michio Kaku. He is my pretend boyfriend. For real. He built an atom smasher for his high school science fair project and is one of the founders of string theory - how could you not be besotted with such a man?!
It is also no secret I love yarn. Almost as much as I love my imaginary fancy man. So when I saw this whilst watching SciFi Science on youtube, I almost died with the awesomeness of the situation!
So ladies, or gents if there are any out there reading, have you ever had a similarly glorious image of your pretend boy/girlfriend with yarn? I know there is a Ryan Gosling pic out there, and that is pretty awesome too ;)
p.s. I know I'm a bad blogger, it's back to O.U. for me now and the first month is always hectic! I have many things that just need a photo, and as I'm trying to improve those I have to wait for a weekend (for daylight!) when the other half is about to take the pics.
It is also no secret I love yarn. Almost as much as I love my imaginary fancy man. So when I saw this whilst watching SciFi Science on youtube, I almost died with the awesomeness of the situation!
So ladies, or gents if there are any out there reading, have you ever had a similarly glorious image of your pretend boy/girlfriend with yarn? I know there is a Ryan Gosling pic out there, and that is pretty awesome too ;)
p.s. I know I'm a bad blogger, it's back to O.U. for me now and the first month is always hectic! I have many things that just need a photo, and as I'm trying to improve those I have to wait for a weekend (for daylight!) when the other half is about to take the pics.
Subscribe to:
Posts (Atom)